This is a tutorial for Ecatalog client who are using G Suite and have a WordPress website with a form. If your website is currently using a plugin called “WP Mail SMTP Plugin” (the SMTP stands for “Simple Mail Transfer Protocol”). The reason why we use it is because your website is sending emails from your domain name (name@yourdomain.com). If you have G Suite / Google’s Email platform, we need to use an application that verifies your the actual owner of the email by forcing a “handshake” between the server your website is hosted on and the G Suite mail server. This way we reduce or remove any “email Spoofing” and the chances of emails from the mail server being automatically deleted or sent to the spam folder are greatly decreased.
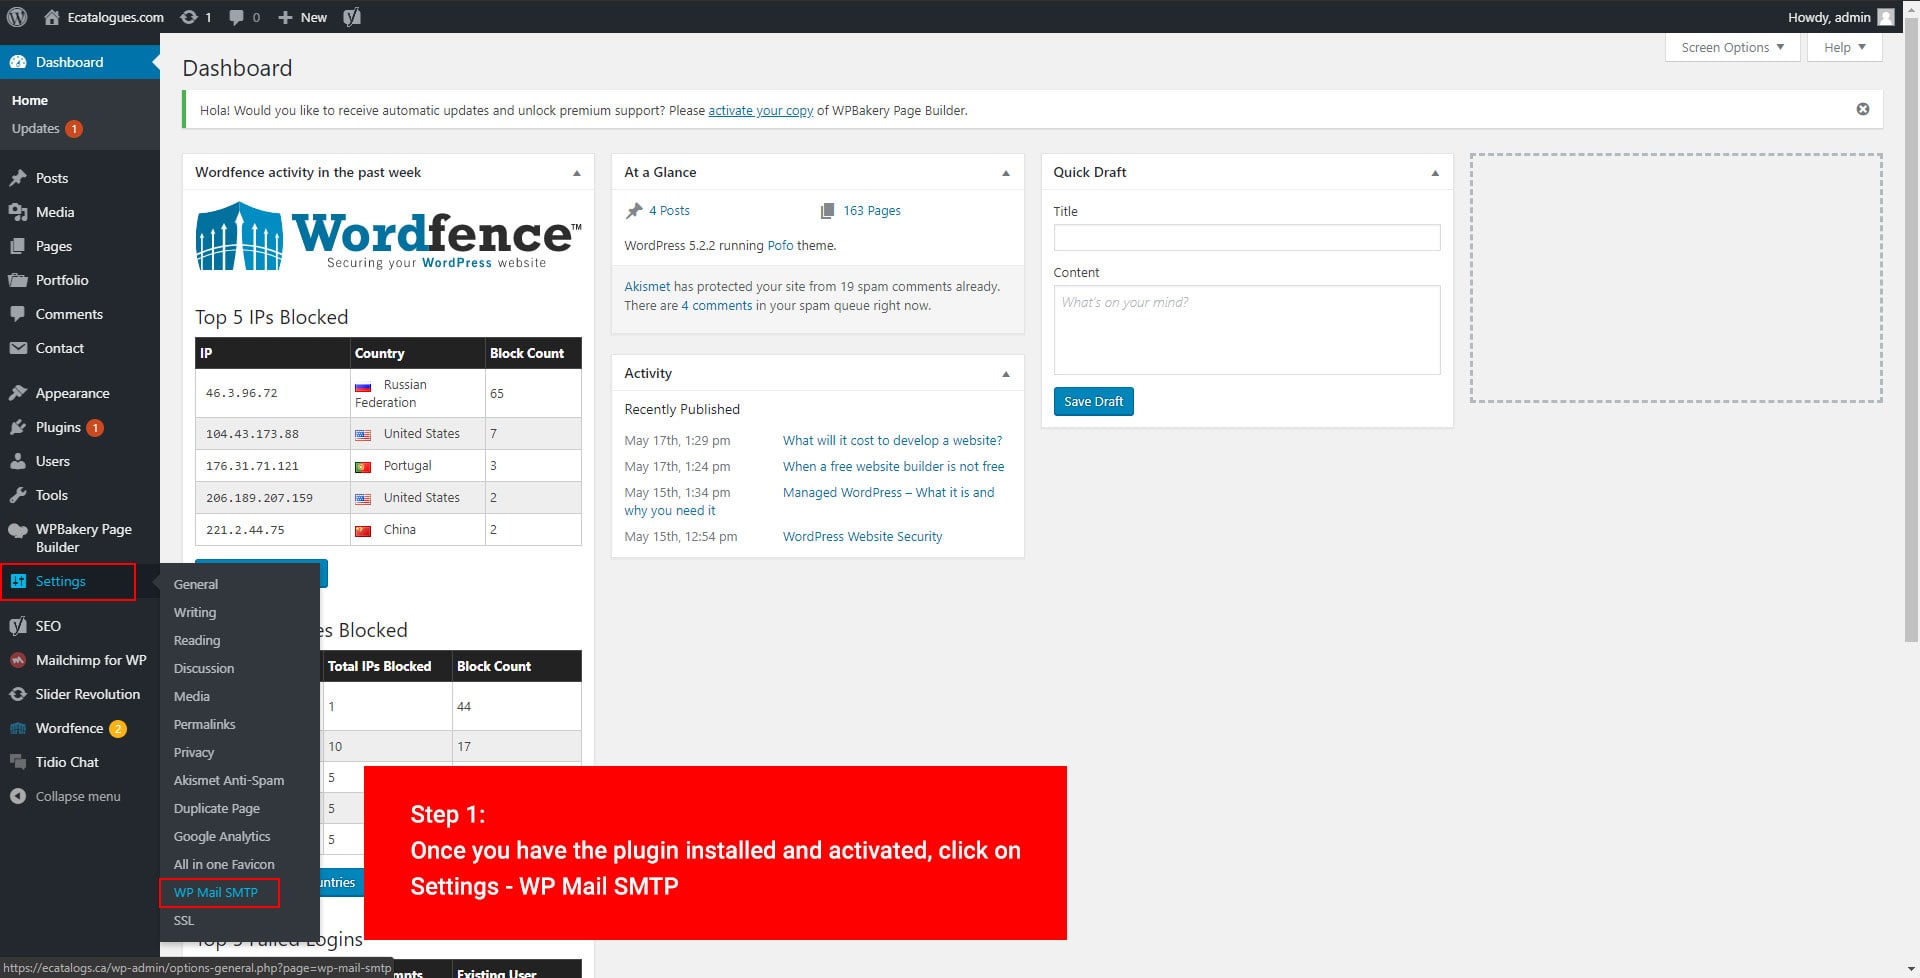
Step 1
Navigate to WordPress admin and go to Settings – WP Mail SMTP.
Step 2
On this step, you will need to fill in the email address (this will be the email address where all the emails will go) then click on “Force From Email” checkbox. Further you will need to also fill in the name (which usually is the website/brand name) and check the “Force From Name” box. What these 2 fields do, is actually forcing the plugin to have a certain email address and a certain name, that you pick. Next click on Gmail box, since we are using the GSuite from Google. At the bottom of this page you will have to click on “Save Settings” button in order for this to be saved of course.

Step 3
For the next step you will have to open a new tab on your browser and sign into your Gmail account. On this page you will have to select “Create a project” from the drop-down list and click on “Continue” button.
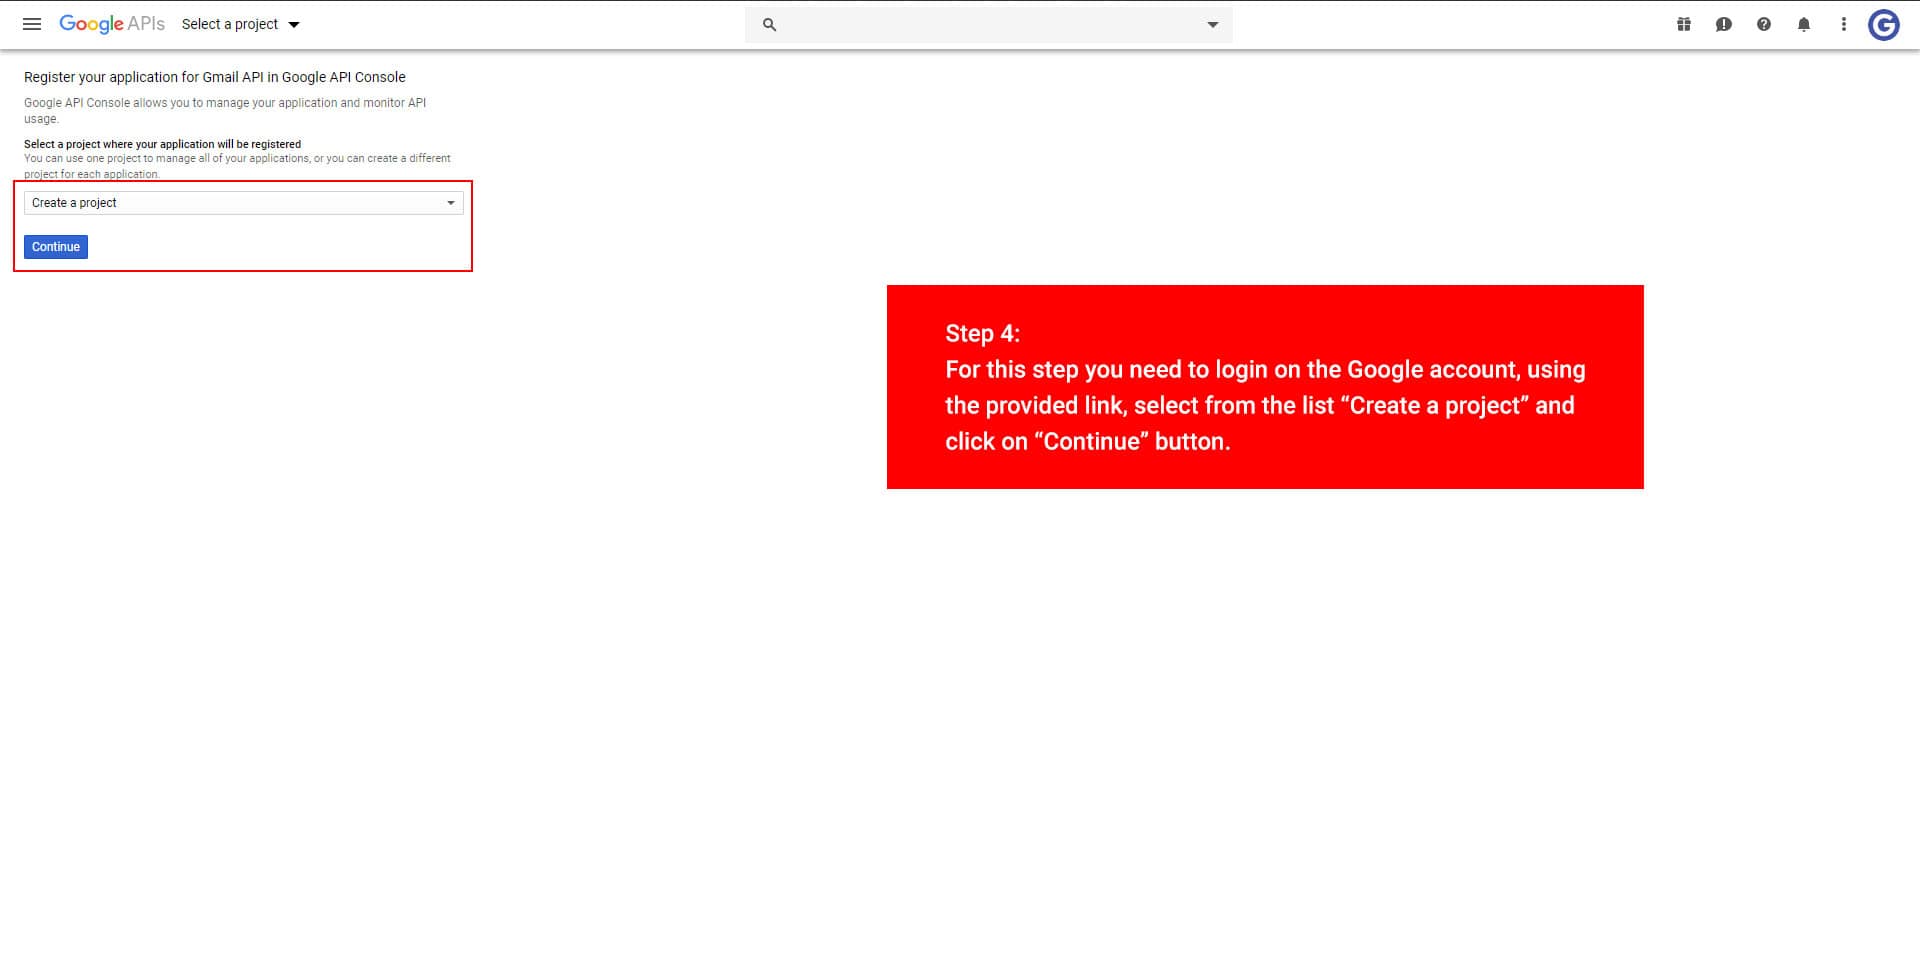
Step 4
After that you will see a page with a button saying “Go to credentials“. Click on it.
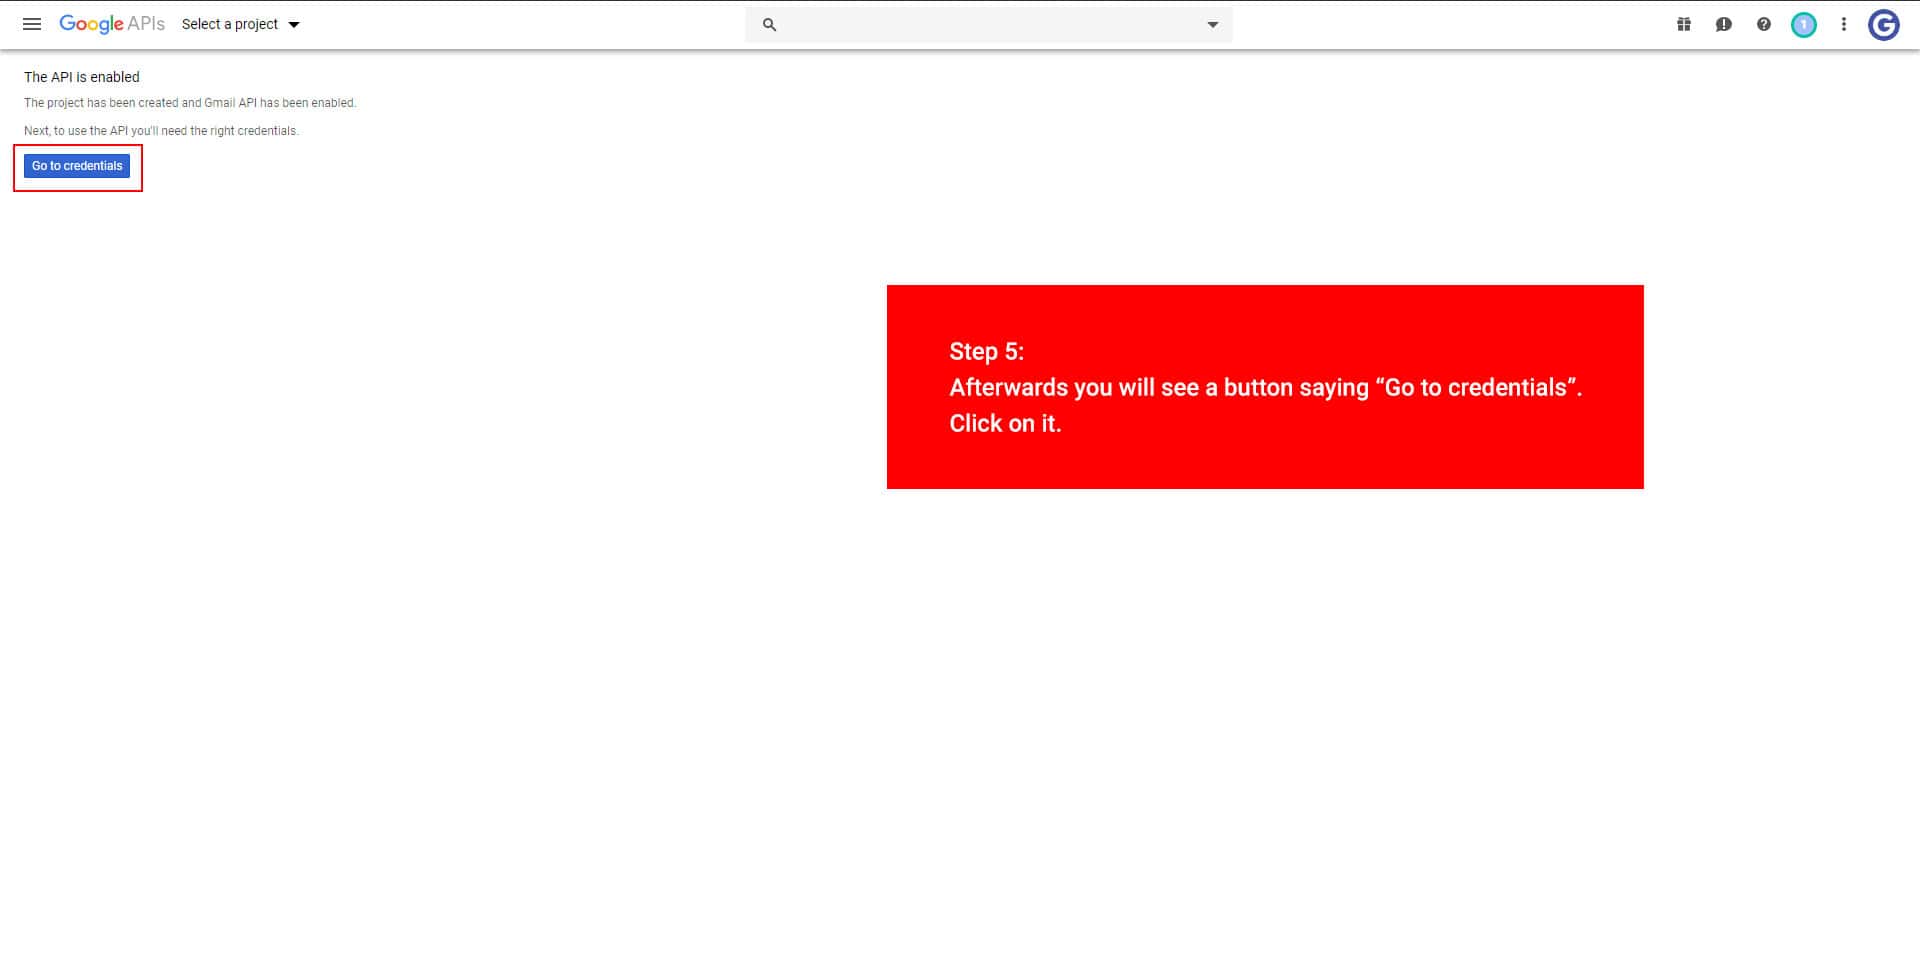
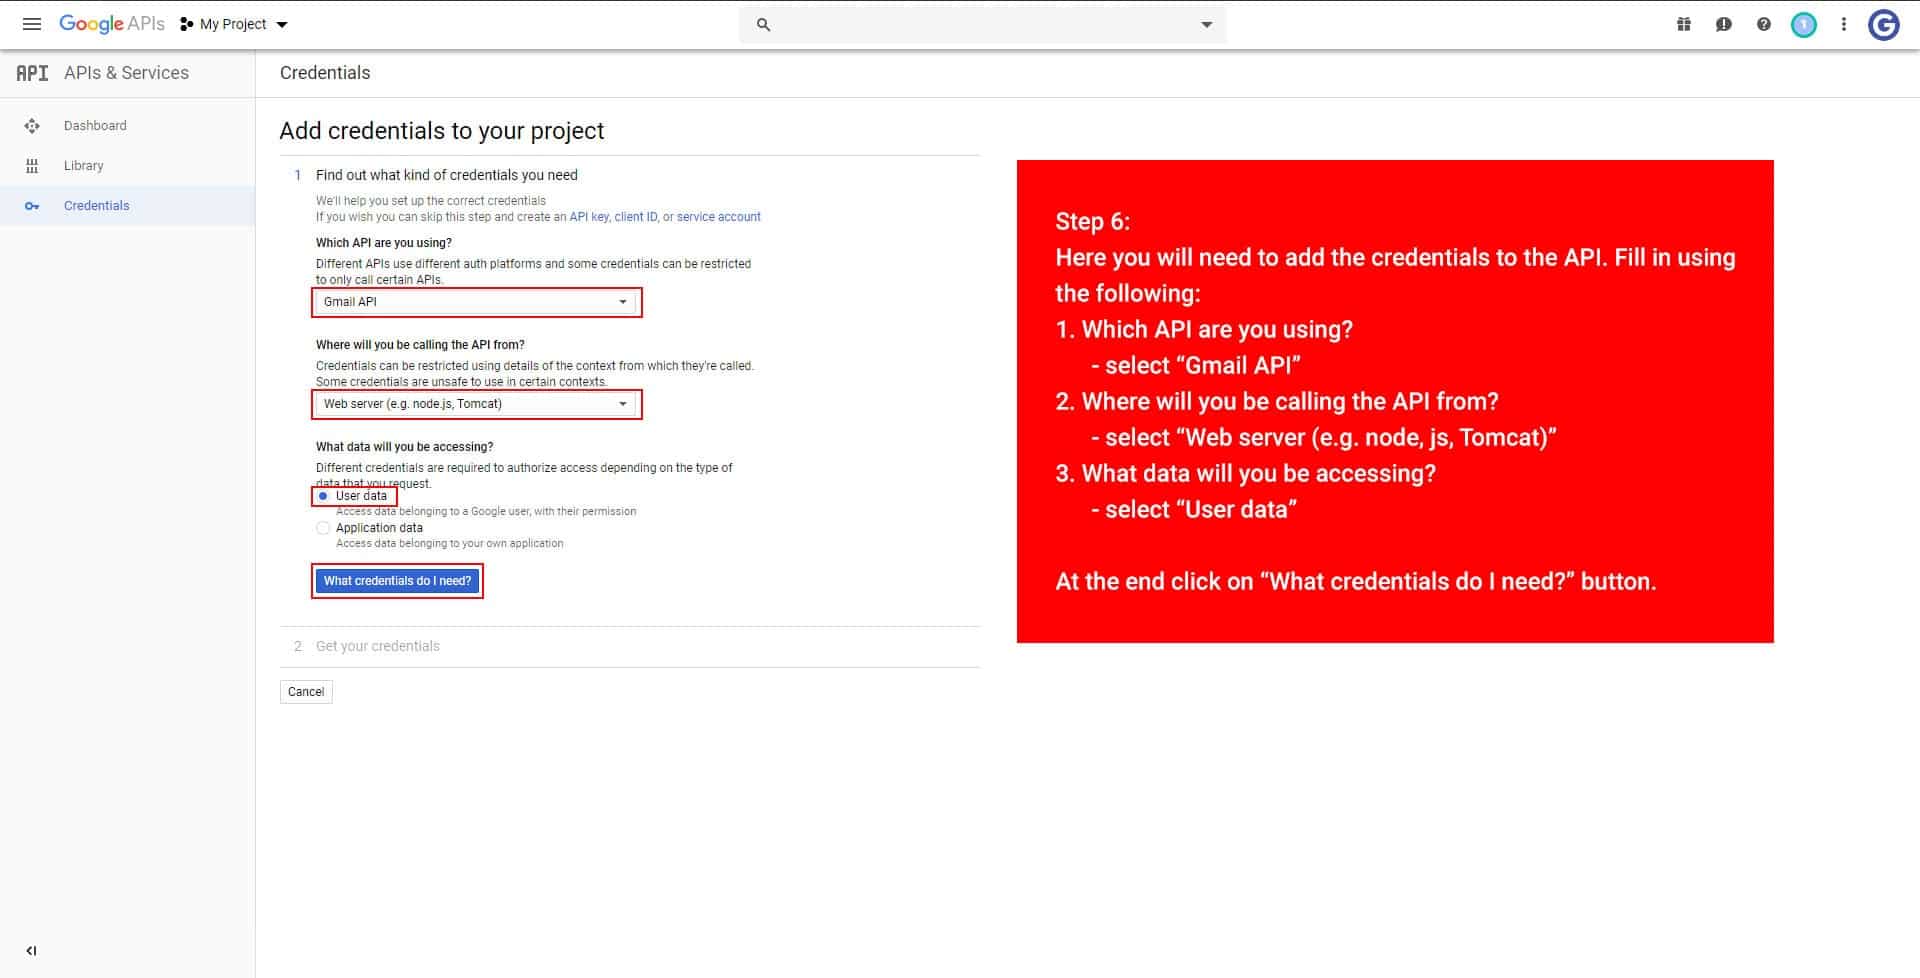
Step 5
In the next page, you’ll be prompted to determine the credentials you need. Here are the fields on this page and the options you’ll need to select:
- Which API are you using? Gmail API
- Where will you be calling the API from? Web server (e.g. node.js, Tomcat)
- What data will you be accessing? User data
Once you’ve made these selections, click the What credentials do I need? button to go to the next step.
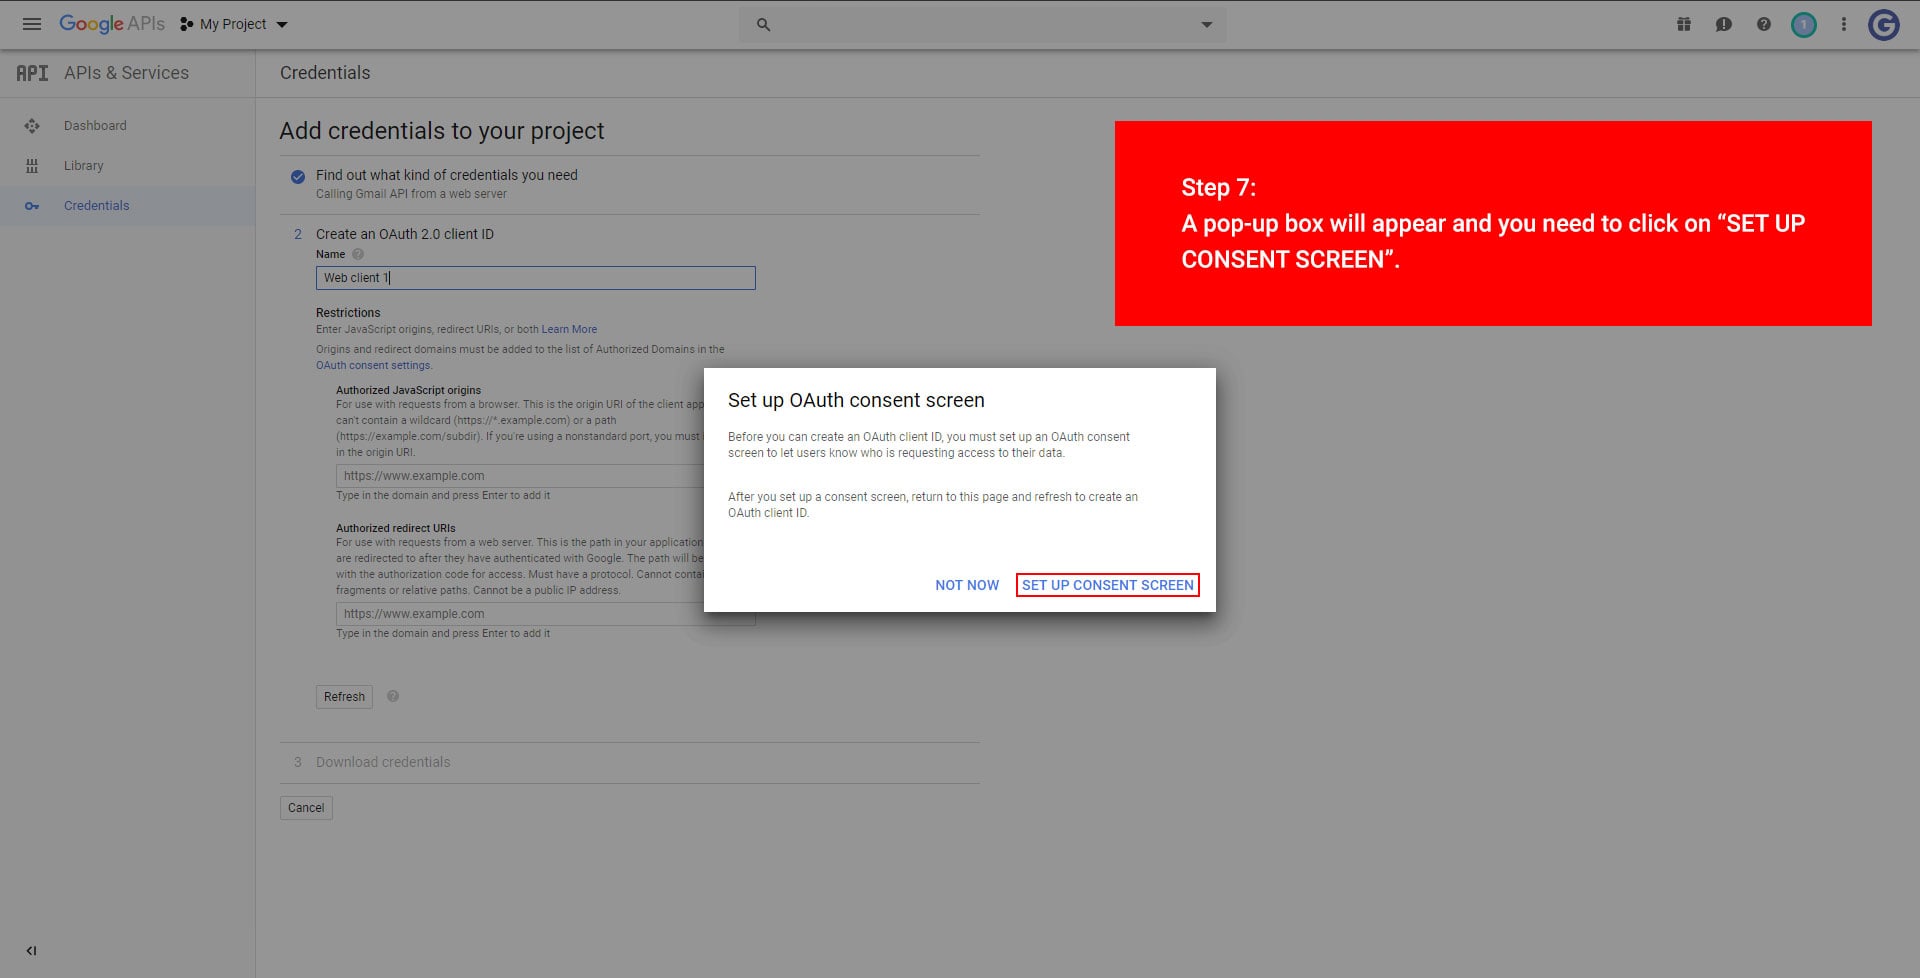
Step 6
After clicking this button, Google will show a popup asking you to set up a consent screen. Go ahead and click on the Set Up Consent Screen Option.
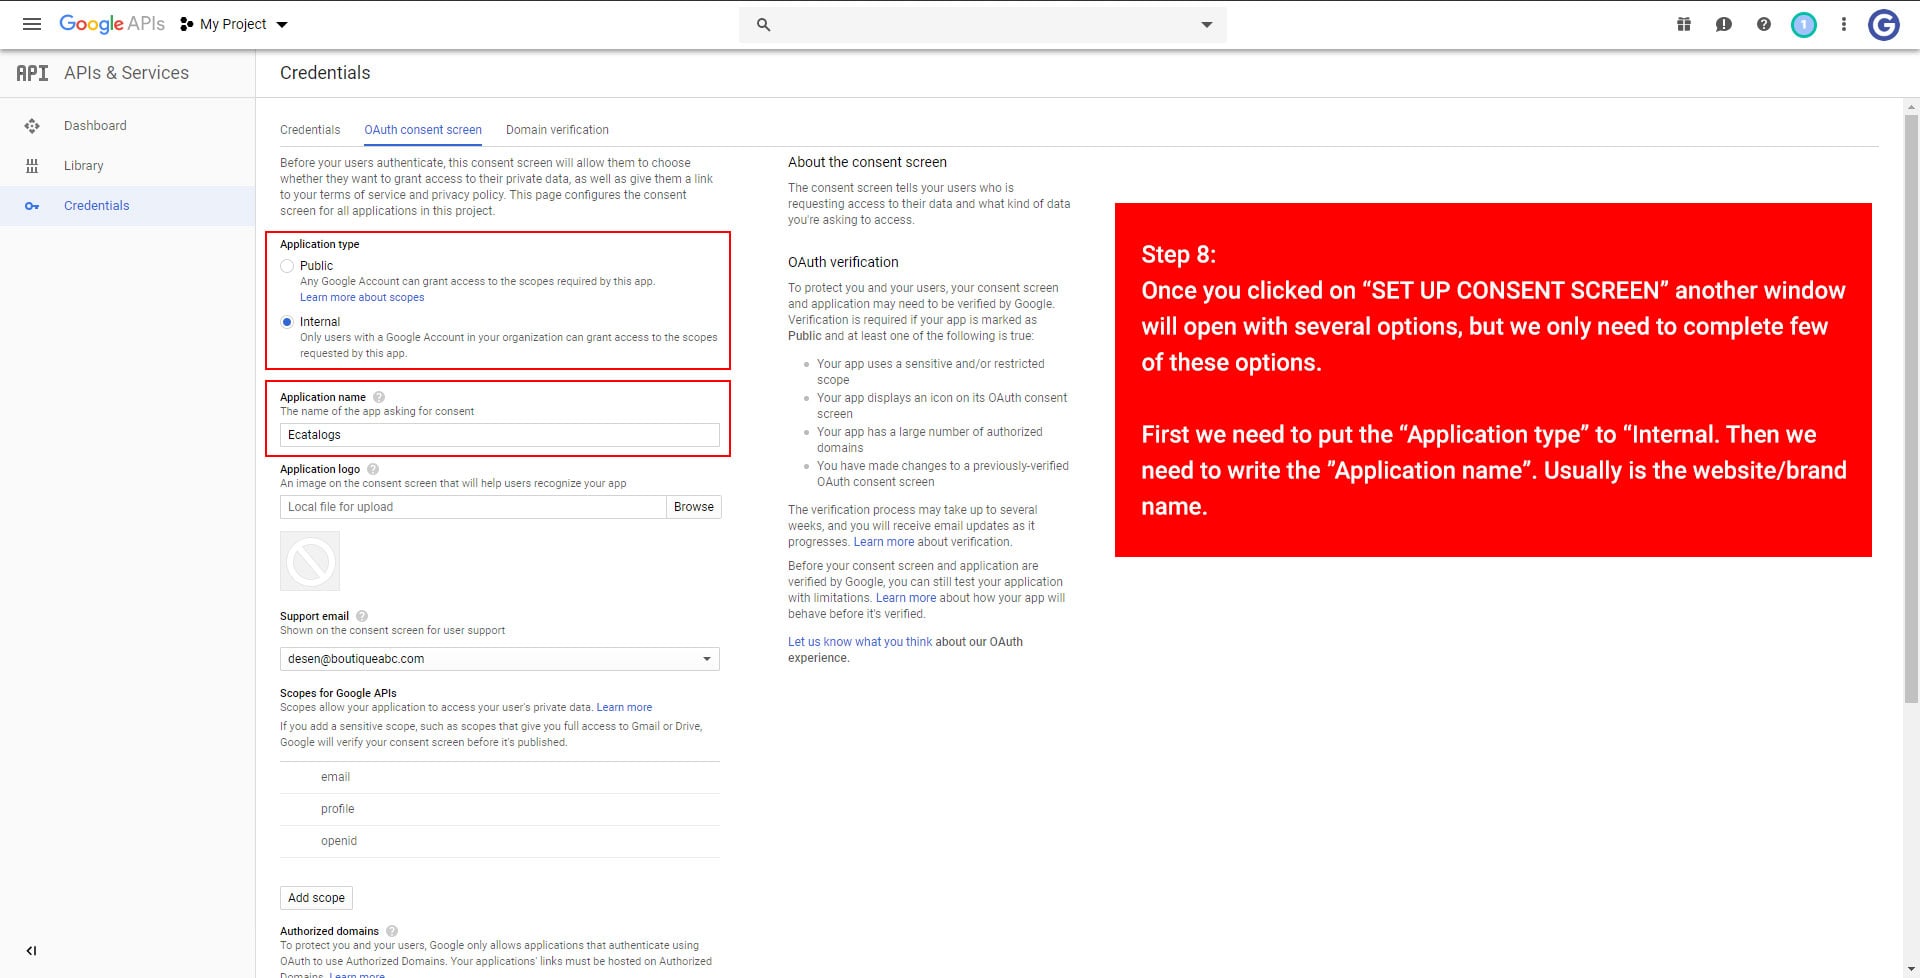
Step 7
This will open a new tab or window. Be sure to keep the original tab/window open, as we’ll return to it a little later.
In the new tab/window, you’ll be asked for several details to prepare your consent screen. This is the permissions screen that will display to you later in the setup process (never seen by your users). If you have a G Suite account, you’ll first set Application type to Internal. You will not see this option if you’re using an @gmail.com email account.
For Application name, you can add the name of your website (or any other name that feels logical to you).
Step 8
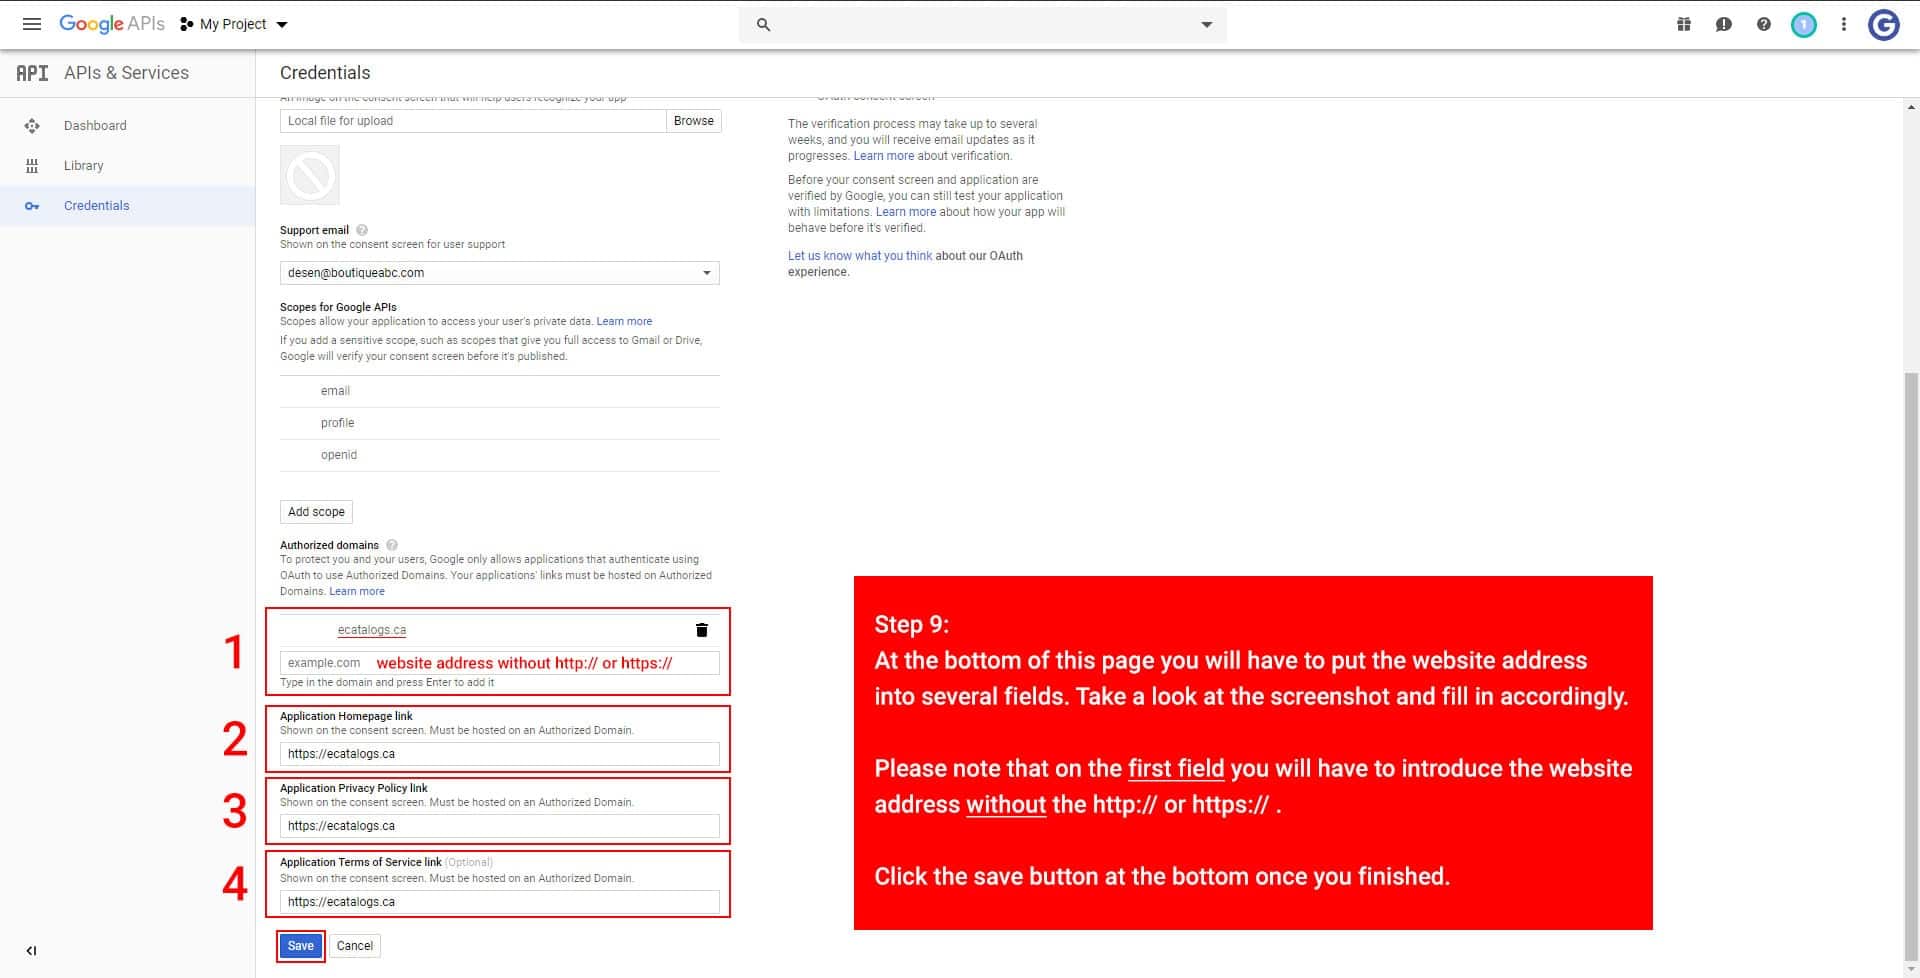
Then, you can skip down to Authorized domains and add the URL for your website. Be sure to not include http:// or https:// here.
For Application Homepage link, Application Privacy Policy link, and Application Terms of Service link, you can again just add your website URL. You don’t need to have special privacy or terms pages in place for this app, as again this consent screen will only ever be seen by you.
Step 9
After saving your consent screen settings, Google will take you back to an API credentials screen. You can ignore this, and instead return to the first tab/window.
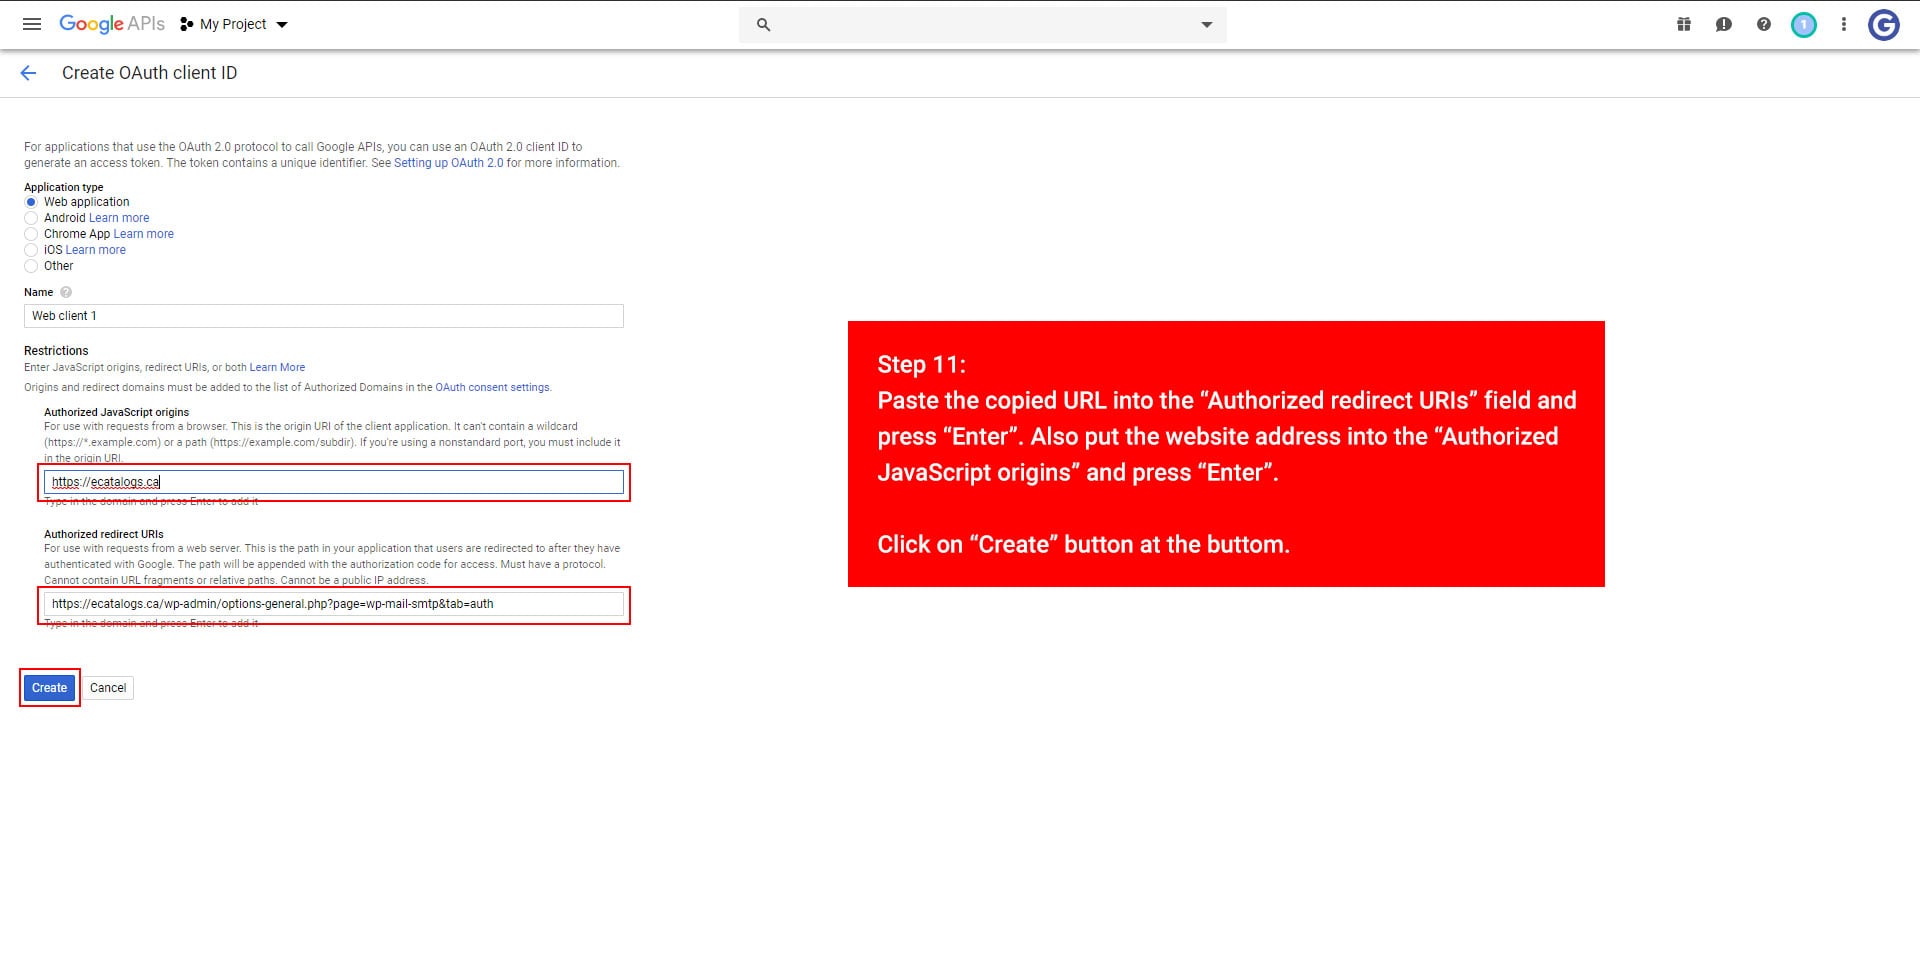
For this step, you’ll be creating an OAuth client ID. OAuth, or Open Authorization, is what will provide permission for your website to use your Gmail account to authenticate emails.
For the Name field, enter anything you like or leave the default name. This is only for reference within your Google account.
For Authorized JavaScript origins, you’ll need to enter your site’s URL.
Last, we need to fill out the Authorized redirect URIs field. To get the URI for your site, you’ll need to go back to the tab or window with your WordPress site. Still on the Settings » WP Mail SMTP page, you’ll need to look under the Gmail section for the field labeled Authorized redirect URI.
The value in this field should be your site’s URL followed by some extra details. You’ll need to copy this value, which is easily done by clicking the button with the copy icon.

Step 10
After copying the URI, return to the Google APIs page and paste it into the field under Authorized redirect URIs.
Note: In order to be certain that Google stores your data, enter the URL and then tap the Enter/Return key. When you see a trash can icon next to the URL, you’ll know it’s been stored and it’s ok to proceed.
Step 11
When you finish filling out these details, you may see a Refresh button near the bottom of the page. Go ahead and click this.

Next, you can click the Create client ID button.

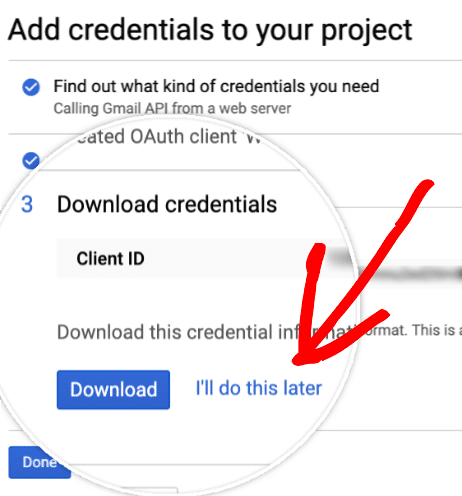
You’ve now successfully created a Google web application!
Now we need to see the full details. On the last screen, click I’ll do this later to go to the Credentials page.
Step 12
On the Credentials page, you can now see the details of the web application you just created. To view Client ID and Client Secret, click the pencil icon.

This will open all of the details for your app. On this page, you’ll see the Client ID and Client secret values.

Each of these will need to be copied into your WP Mail SMTP settings back in your WordPress admin screen.
Note: Be very careful not to copy any extra text or spaces with your Client ID or Client Secret, as this will result in an error in the next step.

Step 12
After saving these settings, the page will refresh. Before Google allows this information to be used to connect to your account, however, you must grant permission.
To do this, scroll to the bottom of this page and click the button labeled Allow plugin to send emails using your Google account.

This will open a login screen for Google. Go ahead and log into the account you’re setting this SMTP up with. Then, you’ll see a screen asking for permission for this site to send email on your behalf.
When you’re ready, click the Allow button to proceed.

Step 13 – Final Step
Next, you’ll be returned to your WP Mail SMTP settings and a success message will be displayed. Now that the connection is complete, you’re ready to send a test email under the Email Test tab.

Once the Test Email tab is open, you’ll need to enter a valid email address and click the Send Email button. Be sure to use an email address you have access to so you can confirm the email is delivered.

When the test message has been sent, you’ll see a success message at the top of this tab.